
Welders use different processes for different types of welds, and each welder has its preferences and understanding of other welding processes. Wire-feed welders are the easiest to learn and use, making them the best choice for beginners. To discover how to wire feed weld, keep reading.
What is wire feed welding?
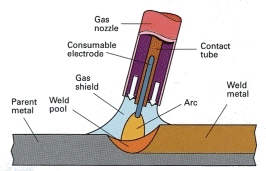
Wire feed welding includes metal inert gas (MIG) and gas metal arc welding (GMAW). Metal is joined using an electric arc to heat the workpiece and a constantly fed filler metal electrode in MIG, GMAW, or wire feed welding. In this method, shielding gas is utilized to protect the weld metal from contamination from the outside world.
A moderate welding machine is known as a wire feed welder. They are designed to connect nonferrous metals that are softer than steel and employ a single-use electrode.
MIG welding is the simplest of the three to use, but it necessitates significant technical understanding to ensure that the technique is successful. You’ll need to understand how to use a welding gun and how to choose the right welding power source, wire feed unit, and speed. You’ll also have to decide the shielding gas and wire electrode to use.
How does it work?
By continuously feeding a wire electrode, a wire feed welder forms weld joints. The wire electrode is put into a machine with a pistol-style electrode holder. When you pull the trigger, a succession of events take place at the same time.
- The power is turned on, and the rollers begin to move.
- As the arc comes to life
- The shield gas begins to flow
- The rollers feed the wire
The constantly burning arc heats the base metal while simultaneously melting the wire electrode. When the two metals melt together, the weld connection is formed. Throughout the operation, the shield gas protects the metals from contamination.
It increases productivity by eliminating the need to interrupt the process to replace a burned-out electrode. On the other hand, Wire-feed welders require a certain level of skill and expertise to accomplish the correct weld.
Considerations when using wire feed welders
Any type of welding demands a certain level of experience and a complete understanding of the process’s nuances. There are a few crucial rules to consider when using a wire feed welder:
Direction
When welding, you can either push or pull. The standard procedure for deciding which route to take is simple. If slag is produced during welding, you must drag or pull it out. When stick welding or flux-cored wire welding, you bring the wire towards you, and you must push the wire through a wire feed welder.
The push technique involves pushing the gun away from the weld puddle. Because the arc force is directed away from the puddle, the push direction results in poor penetration and a flat, wide bead. Another name for it is the forehand technique, and it allows you to see the joint more clearly and better steer the wire into it.
In the pull or drag/backhand technique, the pistol is pointed back at the puddle and then dragged away from the deposited metal. Because of the deeper penetration and small bead, it results in higher accumulation or metal deposit rates.
For MIG welding, you can employ either a push or a pull method.
Work Angle
The work angle of each metal and joint is different. It varies based on the metal used, its thickness, and the type of joint used.
There are four significant weld positions
Flat Position
In calculating the working angle, the type of joint employed in the flat position is crucial.
For butt joints, a 90-degree angle between the gun and the workpiece is ideal. Filler metal should be put into the joint directly. Set the travel angle to 5 to 15 degrees and maintain it throughout the treatment. To avoid an undercut and thoroughly fill in a significant gap, go back and forth over the joint.
When welding a T-joint, keep the wire and the workpiece at a 45-degree angle. The welder must use his skills to modify the angle as needed when welding a T-joint, especially when making multiple passes. Undercuts and uneven welding bead output can be reduced by changing the angle.
Lap joints require a work angle of 60 to 70 degrees. The angle must be adjusted to the thickness of the metal – the greater the angle, the thicker the metal.
Horizontal Position
When welding in a horizontal position, gravitational forces must be taken into account. The work angle can be adjusted from 0 to 15 degrees as desired. A welder adjusts the filler metal to keep it from sagging or slipping over to the bottom of the weld.
The welder must use a combination of push and pull techniques to achieve an even and smooth weld. The travel angle remains constant despite changes in direction and operating angle.
Vertical Position
When welding in an upright position, the importance of a pre-weld setup cannot be emphasized. The work angle will be influenced by many factors. Vertically positioned welds, on the other hand, should have a travel angle of about 5 to 15 degrees from perpendicular. When welding at an angle, the welder must utilize the weaving technique to control the size and shape of the weld bead, and it also controls the cooling of the weld puddle.
Overhead Position
Working with overhead welds is more complex. There is no required work angle for these welds. The ability of a welder to undertake such a task is governed by their previous experience. Even though few people start as experts, there is always an opportunity for trial and error. You can practice on practice sheets before beginning to work on the actual weld.
Travel Angle
The travel angle is the angle produced between the gun and the weld in the plane when it is parallel to the travel direction. Under normal welding conditions, welders maintain a travel angle of 5 to 15 degrees. They produce the least spatter, have the best arc stability, and have the highest penetration levels. By creating more spatters and limiting weld penetration, angles greater than 20 to 25 degrees impair productivity.
Wire Selection
The process of selecting a wire type is straightforward. The following are the most typical wires used in wire feed welders:
- ER70S-3
- ER70S-6
The first wire is a good all-arounder for general welding, while the second is better for rusty or dirty steel. In situations when more deoxidizers are required, such as repair or maintenance welds, ER70S-6 is the ideal choice.
When welding thicker metals at higher temperatures, use a 0.035-inch or 0.045-inch wire, depending on the welder’s application and output range.
A wire with a diameter of 0.030 inches is a suitable all-around choice. However, we prefer 0.035-inch wire for sheets with medium thicknesses and residential and motorsports applications.
For thinner sheets, a 0.023-inch wire is ideal, and it helps regulate heat and reduces the possibility of a burn-through.
Selection of Gas
Shield gas selection is critical when it comes to producing high-quality welds. Using the wrong gas can result in a porous weld as well as harmful, perhaps toxic vapors.
A mixture of 75 percent Argon and 25 percent Carbon Dioxide is the best all-purpose shielding gas for all carbon steels. It produces less spatter, lowers the risk of burn-through on thin metal sheets, and creates the best-looking beads.
You can also use 100% CO2, which works admirably but makes a lot of splatter and more difficult beads.
Wire Length
Arc stability is dependent on the length of the wire that protrudes from the gun. Welders commonly leave a 3/8-inch protrusion from the welding equipment. If you keep going, the arc will start to sizzle like bacon being fried.
Tips and Tricks
Welding is a skill that takes some time to master. By mastering a few key skills, you can learn the craft.
Use a wire with a diameter of 0.9 mm when welding sheet metals. Depending on the thickness and weld joint, wires with diameters ranging from 0.7 to 4 mm are available. You must select the suitable wire since the wire diameter and wire selection have a direct impact on the weld quality.
Safety Equipment
When using a wire feed welder, be sure you’re wearing the proper safety equipment. MIG welding is a risky process since it can emit hazardous vapors in some cases. There’s also a greater risk of radiation burns or being electrocuted. To defend yourself, you’ll need the following items:
- Flame resistant overalls
- Safety boots
- Leather gauntlets
- Air fed welding helmet
To protect yourself from potential fire hazards, you must wear flame-resistant overalls. The electric arc is not always stable when employing wire feed welders. The arc may waver while you’re first experimenting with different voltage and amperage settings, putting the welder in danger. In this situation, the welders’ clothing may catch fire if it is not flame resistant.
MIG welding generates a great deal of heat, which can result in significant burns. Flame-resistant clothing is helpful for protecting against the heat generated during the process. For further protection, the welder must also wear leather gauntlets.
Leather gauntlets, as opposed to gloves, offer additional protection. They reach the welder’s elbow, which is ideal for such a risky welding procedure. Welding produces a great deal of heat, which can cause severe burns to the welder. We propose that you always wear leather gauntlets instead of gloves.
Safety footwear is another crucial piece of protective equipment. When welding vertically or above, a small drop or two of metal may fall to the ground due to gravity. In such cases, the chance of molten metal falling onto the welder’s feet poses a significant safety issue. To protect themselves, welders must wear approved safety footwear.
Last but not least, you must wear the appropriate welding helmet. The welding helmet serves two purposes:
- Protects the eyes
- Provides a safe breathing system
In all of its forms, arc welding produces a vast amount of dazzling light. Because the arc is so close to the welder, it poses a significant safety hazard. Using your naked eye to look at the arc can result in irreparable retinal damage. The welder’s eyes are protected while the process is made easier with an auto-darkening helmet.
The helmet must have an air-fed ventilation system in addition to an auto-darkening glass to prevent the welder from breathing dangerous gases. The welder must also be conscious of their breathing zone and maintain a safe distance from the workpiece.
To avoid putting fumes in your face when using a fume extractor, ensure the nozzle is pointing in the appropriate direction. Instead, direct the extractor as far away from your breathing zone as feasible.
Before you start a welding procedure
- Make sure you’re aware of all the hazards that may arise during the process.
- Always double-check that your helmet and other Personal Protective Equipment meet the welding procedure’s criteria.
- Make sure you understand the equipment and how it operates.
- Before you start welding, make sure you have a Local Exhaust Ventilation System and Respiratory Personal Protective Equipment in place.
- Make sure your coworkers are aware of the facts.
How to Wire Feed Weld?
Welders use varying methods for different kinds of welds. Each welder has a different preference and expertise in various methods. For those new to welding, using wire feed welders can be the easiest to pick up and thus the best technique. Keep on reading to find out how to wire feed weld.
What is wire feed welding?
Wire feed welding is the same as Metal Inert Gas (MIG) welding and Gas Metal Arc Welding (GMAW). MIG, GMAW, or wire feed welding joins metal by heating the workpiece and a continuously fed filler metal electrode with an electric arc. The process employs the services of shielding gas to protect the weld metal from external environmental contamination.
A wire feed welder is specifically designed for mild welding. They utilize an entirely consumable electrode and are ideal for joining nonferrous metals that are relatively softer.
MIG welding may be the easiest to use out of all, but it involves complex technicalities to ensure that the process proves productive. You need to master the use of a welding gun and figure out the correct welding power supply and wire feed unit and speed. You also need to determine and use the ideal shielding gas and wire electrode.
How it works
A wire feed welder uses a continuously fed wire electrode to produce weld joints. You insert the wire electrode into a machine featuring an electrode holder shaped like a gun. Once you press the trigger, multiple things start to happen at the same time.
- The power supply springs into action and the rollers begin
- The arc springs to life
- The shield gas begins to flow
- The rollers feed the wire
The continuously burning arc heats the base metal and simultaneously melts the wire electrode. The two metals melt together to form the weld joint. Throughout the entire process, the shield gas protects the metals from environmental contamination.
It increases productivity rates as it eliminates the need to stop the process and replace the burnt-out electrode. However, using wire feed welders requires skill and technique that you need to master to ensure you produce the perfect weld.
Related Questions
What distinguishes a MIG welder from a wire feed welder?
The use of a MIG welder is quite similar to the use of a feed welder. The filler metal wire is introduced into the gun during MIG welding. As the thin metal wire passes over the rollers of the machinery, it heats up, melting and forming the weld.
What distinguishes a TIG welder from a MIG welder?
A MIG and TIG welder both employ an arc. The only difference between them is the way the arc is applied. By pushing a feed wire through the gun, a MIG welder creates a spark, and it warms and melts steel to make the weld junction.
TIG welding uses long metal rods rather than thin metal wires.
What exactly is MIG welding, and how does it function?
A type of inert gas welding is metal inert gas (MIG) welding. An electric arc and a solid wire electrode are used. As the arc heats the wire, it melts, filling in weld seams. The arc also heats the base metal, guaranteeing that the filler metal and the workpiece have a solid bond. In its complete form, GMAW stands for gas metal arc welding.
Shielding gas is also employed in the process to keep the metal from interacting with atmospheric gases like oxygen and nitrogen.
What is MIG used for?
Hobbyists, farmers, ranchers, and amateur welders choose MIG welding because it is more user-friendly. Others have even compared it to using a glue gun. While this isn’t entirely true, the process is more straightforward than other welding methods.
A feed welder can handle almost all repair welds on material ranging from 24-gauge to 0.5 inches thick. It is not very efficient against corrosion, grease, or dirt, so make sure to clean and prepare your work surface prior to getting the best weld quality possible.
How to feed wire into a portable MIG machine?
Portable MIG welding equipment makes weld jobs a lot easier. The tiny device makes its way to the workpiece, halving transport costs and time. On the other side, using a portable machine can be difficult.