Changing battery in welding helmets is pretty simple, as seen in the video below. However, it is only simple if the batteries can be replaced.
If the batteries in your auto darkening welding helmet aren’t replaceable, you’ll have to do some DIY work to have them replaced.
Proceed with caution as this could compromise your safety. Both will be discussed. How do replaceable and non-replaceable batteries differ?
So let’s started
What things you will required
If you’re replacing a replaceable battery, you’ll need a new battery(s), a user manual, and maybe a screwdriver.
If you’re replacing a non-replaceable battery, you’ll need a cutting tool like a Dremel rotary tool, superglue, and possibly a soldering iron.
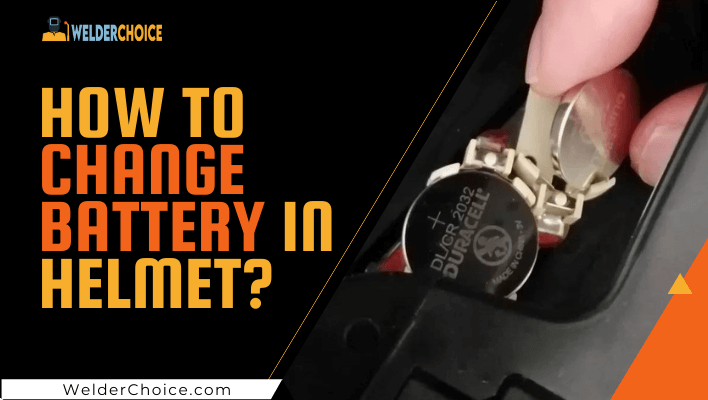
The type of battery you’ll need depends on the model of your welding helmet. Lithium 3V batteries are most commonly used in auto darkening welding helmets. These come in a number of different formats, including CR2450, CR2330, and CR2032. Let’s get this celebration started, shall we?
How to Locate Battery in the Helmet
An auto darkening welding helmet’s battery holder will be located near the main unit from the inside, but this will vary greatly depending on the welding helmet.
The core device, which houses the auto darkening filter and all of the adjustable knobs, must be disassembled in most welding helmets. In this context, the term “disassemble” is used sparingly. It’s usually a straightforward procedure.
If you wish to replace a non-replaceable battery, though, you’ll need to put in a lot more effort. The handbook will be helpful, but if it does not specify where the batteries are located, you will have to look for them yourself. Depending on the model, they can be found anywhere around the main unit, however, they are normally closer to the sensors and solar tray.
Make the most informed decision possible. Because the button cell battery must be able to fit in the main unit panel, don’t look for them elsewhere if there isn’t enough space.
We go through how auto darkening welding helmets work in a separate topic. This information could be beneficial in locating the battery.
Replace the battery in a welding helmet with replaceable batteries.
Unclip and remove the main panel from the lens covers if you need to replace a replaceable battery, then seek the battery holder.
You may need to unscrew it, or if you’re lucky, just gently pull it out to avoid damaging the holder or its limited gripping area. Proceed with caution because the holder is usually highly sensitive. If you have large fingers, it will be much more difficult.
Cheap imported helmets are much more sensitive, so be careful not to break something on the lens case if you want a longer service life.
With that stated, after you’ve replaced the original battery, you’re done. Reattach the panel to the welding helmet with clips or screws, make sure your welding helmet auto darkens properly, and resume welding.
Non-replaceable Batteries: Removing and Replacing
Things are about to get much more complicated. First and foremost, changing a non-replaceable battery in a welding helmet is not recommended. This is because your welding helmet’s safety, as well as the auto darkening feature, maybe compromise. With that said, here are some pointers and instructions if you still want to go ahead and do it.
Cutting out the plastic that holds the battery in the welding helmet
If you’re still wondering where the battery should go, this will be challenging. The trial-and-error method may be used, but it would be similar to oil drilling. Your welding helmet will resemble a Frankenstein’s monster by the time you’re done.
I recommend conducting some online research to see if there are any other auto-darkening helmets with more details. Many of these non-replaceable battery welding helmets are based on designs made in low-wage countries like China and India.
You can cut where the lithium batteries are located if you find a helmet with a comparable main panel design and can figure out where they are housed.
It will, however, spend most of its time near the solar cell. Use considerable caution when cutting. Use a sharp rotary tool and cut carefully to prevent damage to any internal wiring, solar system, or PCB boards.
You can also pry open the panel if it can be pryed open. After ripping open the auto darkening welding helmet and locating the battery, take a picture of the current arrangement. You can be sure that everything is put back together correctly this way.
Removing the old battery and getting the old one out
Due to the fact that these are non-replaceable lithium batteries, they will almost probably be connected to a wire or stored in a non-plug-and-play way. Take your time removing the old batteries because the connectors are fragile. This will ensure that no wires or connectors are harmed.
After that, replace the batteries in your auto-darkening helmet device, soldering the leads to the batteries if necessary or copying the previous batteries’ connection. Take care not to overheat the sensitive equipment or the darkening system when soldering the battery holder leads. Keep in mind that soldering is done automatically in a flash at the manufacturer, and the sensitive circuits are not subjected to high temperatures.
If the batteries do not have the same polarity as the original batteries, they will not work.
Gluing the plastic component
The Dremel-created plastic cutout must be returned to its original spot. It’s as simple as using superglue.
You should first test the welding helmet’s auto darkening mode to check that the battery is working properly. A basic sun test would be enough, but you can also glue the plastic cutout partially and test everything with the welds themselves. When you’re certain that changing the batteries worked, discard the old batteries, glue the cut out completely, and you’re finished.
Consider the following points if you decide to replace your battery on your own.
Welding is a dangerous activity, and drilling, cutting, modifying, or gluing your welding helmet may compromise its safety.
This is something you must understand and embrace. If you’re a hobbyist welder who only makes low-amp welds, this is OK if done properly. If you’re a professional, however, I wouldn’t endorse this technique.
Assume you’re on-site, and the sensors in your helmet have failed, stopping you from working. That does not look to be a favorable circumstance for you. It doesn’t have to be battery functionality; it might be that something went wrong with the analogue circuitry or the PCB, and it’s now worn out.
If you’re a professional welder, you should choose a welding helmet with a simple battery replacement technique. Don’t waste your time messing around with DIY mods unless you truly want to.
Conclusion
If you have a welding helmet with auto darkening and replaceable lithium batteries, that’s ideal. You’ll be able to replace the battery without compromising your safety. Solar helmets also require batteries, but they are powered by the electricity generated by the solar panel.
It’s as simple as removing the old battery and replacing it in the battery trays to change the batteries in your welding helmet. If your helmet won’t let you do this, you’ll have to find the battery, cut it out, replace it, then reassemble it using hot glue.

With 8 years of experience a senior welding instructor and safety equipment researcher and writes articles, reviews and guidelines on helmets and other welding and safety gears at Welder Choice, and other written works have been published in various publications.