Looking for some flux core welding tips? We got you. Read our article further for more information.
Some of the folks you’ve spoken to have probably mentioned flux welding, but you have no idea what it is. You’ve seen the flux core weld projects they’ve performed and the fluidity of their flux core wire. You’ve bought a flux core welder, but before you can start welding flux, you’ll need some flux core welding tips.
The best flux core welding tips from the pros are included in this authoritative post. When you’ve finished reading, you’ll understand how to get the most out of your welding projects, and people will be asking you about your welds in no time. All you have to do now is choose one of the top flux core welders for your job!
Let’s move forward towards flux core welding tips.
Flux Core Welding Tips
Before telling you some flux core welding tips, let’s first find out what flux core welding is.
What Is Flux Core Welding?
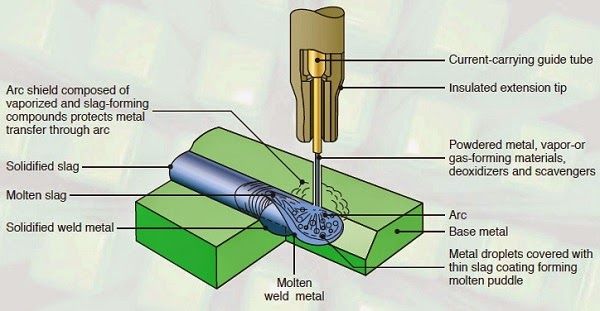
Flux Core Welding is an electric arc welding process that provides for better weld penetration and can be automated or semi-automated. It’s not dissimilar to traditional arc welding or even MIG welding. However, one significant distinction is that the wire used contains Flux (hence the name), which covers the entire weld.
This enhances the weld’s durability and strength since it cools down more slowly than other welding techniques. Because the flux wire has its own shielding, there is no need for a separate gas tank for flux core, this technique has a lot of applications in production.
Flux Core Welding Tips To Weld Outdoors With Ease
Many people have the misconception that stick welding is the only way to weld outside. That isn’t the case now. If you’re diligent and thorough, you can use flux welding outside successfully.
The wind is one of the factors to consider when welding outside. The shielding you’ve erected around your weld can simply be blown away by a gust of wind. If you’re concerned about this, self-shielding methods or gasless welders can help.
You should also be cautious when selecting your wiring. Traditional difficulties with outdoor welds can be avoided with self-shielded flux core wires. Without needing to swap wires or have shielding blown away, these will allow for continued workflow.
First Things First: Flux Core Welding Basics
You must prepare yourself before beginning to weld. Welding can be quite dangerous, so make sure your workspace is ready to avoid fires and injuries. Remove any potential fire hazards and avoid practicing in enclosed areas with little ventilation.
Safety glasses, a welding jacket, an industrial-grade welding helmet with auto-darkening capabilities, welding gloves, a leather apron, uncuffed denim or work pants, and leather shoes or work boots are all recommended. You should wear flame-resistant clothing at all times.
Metal Preparation
Because it is more tolerant, flux core welding is ideal for novices. To clear your surface of contaminants, you won’t need to undertake as much extensive preparation. That isn’t to say that harmful habits are acceptable. Cleaning the surface area of your base metals will always result in a better and stronger weld. This will also help to avoid corrosion and scaling.
When working, use a metal brush or a grinder. Clean the area of your base metal where you plan to connect your clamp as well. Failure to do so will result in a poor contact area and resistance in your circuit, which will inevitably result in a poor quality weld.
Beveling the edges of thick metals is something else you’ll want to accomplish. This will aid in the formation of a full fusion in your final welds. When it comes to butt joints, this is especially true. This will lower the thickness of your weld and allow you to start with a strong initial weld that you can build on without losing strength.
Equipment Preparation
You should also ensure that your welding equipment is safe to use and ready to weld. Make sure that all of your cables are in good working order. Replace them with better ones if they are fraying, loose, sparkly, or otherwise problematic. All of your connections should be extremely secure.
You’ll also need to figure out what your polarity is. A DC electrode tuned to negative is required for flux core welding tasks. Straight polarity is the term for this. These connections can be found on the interior of your machine near the driving rollers.
When it comes to driving roles, it’s critical that you choose the right ones for your project. Because flux core wire is softer than other, more substantial wires, knurled drives are an excellent choice. They’ll give your wire the bite it needs without deforming or crushing it. When welding with flux core, avoid using ordinary drive rolls.
You should also check to see if your wire tension is balanced. You’ll have troubles with your wire feed if you have too much or too little tension on one of the driving rollers or in the wire spool hub. Make sure your tension is set according to the user manual for your welder.
You should also keep an eye out for any consumables. Removing extra splatter from contact tips can allow you to work more efficiently. Replace your contact tips if they’re starting to show signs of wear. The same can be said about soiled liners. Remove any rusted wiring from your system.
Wire Selection
If you’re working with mild steel, utilize the E71T-11 flux core wire. It’s adaptable enough to work in any situation. It is available in a wide variety of sizes and shapes. It’s also fantastic for offering superior welding properties on both thin and thick materials.
When it comes to wire diameter, you should aim for a diameter of around.030 inches. This is a versatile, general-purpose diameter that may be used to weld a wide range of metals and thicknesses. If you’re welding particularly thick material at high overall heat levels, go with a.035-inch wire, but the maximum diameter for highly powerful output welder ranges is.045-inch wire.
Amperage And Voltage
The voltage and amperage necessary for your welding project are mostly determined by the thickness of your metal, the arrangement of your joints, the position from which you’ll weld, and the diameter of your wire. To determine the proper voltage and wire feed speed for your metal, wire thickness, and welder capacity, consult a chart or use an online calculator. It will be much easier to make modest tweaks and fine-tune your performance from there.
Wire Stick-Out
The length of your unmelted electrode that extends from the tip of your contact tube outwards is known as the stick-out of a wire. It does not contain the length of your arc. Stick-out lengths for flux core welding are typically 34 inches. This is double the recommended stick-out length for MIG welding.
Push Or Drag?
When it comes to flux core welding, it’s always best to drag. Slag is frequently pushed into your weld puddle when you use the MIG. This results in a filthy weld. Pulling (or dragging) your torch through the joint ensures that you spatter lands on the completed weld, reducing the risk of porosity.
The ideal method to use this technique is to point the tip of your welding gun backwards towards the weld pool and then drag it away from your completed weld. “If there’s slag, you should drag,” goes the proverb.
Travel Angle
A travel angle in welding is defined as the angle between your welding gun and the plane of your weld joint when your gun is held perpendicular to the plane. In normal welding settings, your journey angle should be between 5 and 15 degrees for all positions. Excessive splatter decreased penetration, and an unstable arc will result if your angle exceeds 220 or 25 degrees.
Work Angle
The location of your welding gun in relation to the plane of the welding joint is known as your work angle. With each new welding position and joint configuration, this angle will change.
Flat Positions
Hold your gun at a 90-degree work angle for flat locations or butt welds with a 180-degree joint. Regardless of the direction, the task is being done from, this angle should be maintained. Using short, side-to-side motions, direct your fuller metal right into your joint at a 5 to 15-degree travel angle. This fills in a wide space while also allowing for many passes. By lingering slightly at the side of a weave bead as it occurs, you can avoid undercut.
T joints have a 90-degree angle. A fillet is a term for this type of weld on this joint. For this project, hold your rifle at a 45-degree angle. It should be spaced evenly between each piece of your weld joint. When working on the fillet joint in numerous passes, the work angles should shift slightly to one side first, then the other. This will prevent undercutting and uneven beads.
Another type of fillet weld is lap joints. Holding your rifle between 60 and 70 degrees is required for these joints. More heat will be sent into the bottom portion of our metal as a result of this. The larger your angle should be, the thicker your metal piece is.
Horizontal Positions
Because gravity adds some force to your welds in this position, you should adjust your angle by 0 to 15 degrees to compensate. The top piece of metal in your weld should now be facing upwards with your gun. You’ll wind up with droopy filler that rolls over on the bottom side of the welded joint if you don’t modify your work angle. The travel angle should remain constant.
You should weave slightly to fill the joint if you’re welding many passes over thick metals or need to bridge a gap if the fit is poor. To prevent undercutting and to guarantee that your weld is correctly hooked into the base metal, pause for a second at the top toe of your weld. The voltage and amperage parameters should not differ significantly from flat welds, however, they may be slightly lower.
Avoid Wire Feeding Problems
The two most typical wire feed issues are burn back and bird nesting. Your arc will be prematurely extinguished, resulting in faults in your weld.
Burn back occurs when the wire on your contact tip melts into a ball. This usually occurs when your wire feeds too slowly or your gun is too close to your workpiece. Use the proper feed speed for your gun and project, and keep at least 14 inches between your contact tip and your work to avoid this problem.
Bird nesting occurs when your cable becomes tangled and the feed is interrupted. Make sure you’re using knurled drive rolls to avoid these problems.
Stop Porosity And Worm Tracking
These two problems are rather prevalent. They compromise the integrity of your welds and produce discontinuity.
Porosity occurs when your gas becomes trapped in the metal of the weld. Remove rust, grease, and discomfort before welding to avoid this. Deoxidizers in filler metals can also help.
When your gas leaves marks on the surface of your weld, this is known as work tracking. You can avoid this by making sure your voltage parameters are set to the voltage and amperage recommended for the diameter and thickness of your wire and metal.
Eliminate Slag Inclusions
Slag can be avoided by dragging and tugging. The trailed arc prevents splatter from entering the joint, resulting in a strong and clean weld. If you want to avoid slag, never, ever push your flux weld if you’re trying to avoid slag.
Prevent Undercutting And Lack Of Fusion
Making ensuring you have the appropriate travel and work angles is the greatest approach to avoid undercutting and lack of fusion. Use the instructions above to learn how to weld your specific joint properly. Whether you’re weaving or halting, pay attention to the technique.
Avoid Excessive Penetration Or Lack Of Penetration
The safety and longevity of your weld are highly dependent on attaining the optimum amount of penetration so that it can properly fuse with the metal component.
It’s all about the angles when it comes to penetration. If you’re having trouble getting through, try welding vertically uphill. Flux core MIG wire penetrates thicker metals more effectively than solid core welders.
To gain that extra amount of penetration, simply weld vertically with an uphill motion. Working up the task in a back-and-forth motion produces a stronger weld than working horizontally. You can also get more penetration by using the correct flux core wire.
Practice
Welding is a skill that requires practice. You must practice skills in order to improve them. Because they are working to be the best at their craft, Olympic athletes have almost no social life or free time. World-class dancers are in the same boat.
This implies that you shouldn’t be discouraged if your first few welds aren’t perfect. Welding will also necessitate practice. It will take some practice to maintain the correct angles and procedures, regardless of how great your parameters are.
Find out where your weld is lacking and research strategies to improve it. Go practice after you’ve read about how to fix those problems! It is said that practice makes perfect.
How to know you achieved a strong flux core weld?
By doing a visual check, you can determine whether you able to make a nice and strong weld. A solid weld will appear smooth, consistent, and continuous. It ought to be seamless and have a constant texture and color.
Additionally, there should be no slag, porosity, or other flaws in the weld. Strong mechanical strength, good corrosion resistance, and good ductility are all characteristics of a strong weld.
Core weld puddle made of flux
You can also run a destructive or non-destructive test to further verify a solid weld. Bending, tensile strength testing, and hardness testing are examples of destructive tests. Radiography, ultrasonic testing, and magnetic particle testing are examples of non-destructive tests.
FAQs
Conclusion
There you go, some great flux core welding tips to help you weld easily and without any difficulty. If you’re still having some confusion regarding welding tips, read FAQs to clear your mind. Don’t forget the safety part though. Hope we helped you.

With 8 years of experience a senior welding instructor and safety equipment researcher and writes articles, reviews and guidelines on helmets and other welding and safety gears at Welder Choice, and other written works have been published in various publications.